sudo apt-get install timidity timidity-interfaces-extra timidity-el
Showing posts with label Multimedia. Show all posts
Showing posts with label Multimedia. Show all posts
Playing MIDI files on Ubuntu
Posting this here because I tend to forget these things. To get Ubuntu to play your MIDI files, install the following packages below.
Music notation on Ubuntu
 Another book project came my way, this time with an interesting twist: it includes a short libretto with sheet music. Now, how to get it to Linux? My preliminary searches turned up several surprising candidates, many of them listed by Linux-Sound.org
I loaded the three that I could find on the Ubuntu repositories: Lilypond (with Denemo), NoteEdit, and NtEd. Yes, they're all in the repositories!
After trying them out, I ultimately settled on NtEd. Lilypond seems to be the most full-featured, but for what I need right now, NtEd fits the bill. (NoteEdit also comes from the same author of NtEd).
Brasero bug and normalizing audio
Ubuntu's default CD burning tool Brasero is pretty nifty: intuitive, simple-to-use, and quite versatile. However, as I found out today, there's a bug that comes out when you're creating an audio project in the version that comes with Jaunty. (I only found out now because I've never had the occasion to use it. I am obviously not an audiophile.)
Anyhow, the error pops up when Brasero attempts to normalize the sound tracks. Brasero tells you that it's normalizing, and it will just stay there, albeit with the Cylon-like progress bar.
To get around this error, turn off Normalization in the plugins window. You can access this window by clicking on
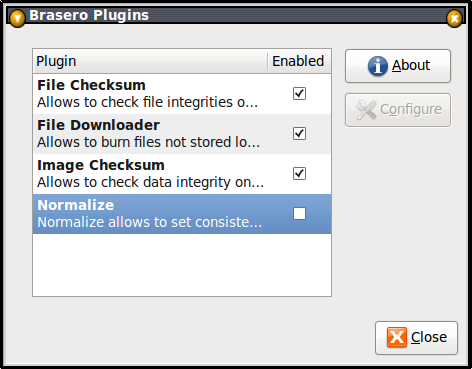
Brasero should work fine after that.
If you do want to normalize audio, you can do that separately by installing a package called, well,
Anyhow, the error pops up when Brasero attempts to normalize the sound tracks. Brasero tells you that it's normalizing, and it will just stay there, albeit with the Cylon-like progress bar.
To get around this error, turn off Normalization in the plugins window. You can access this window by clicking on
Edit->Plugins on the Brasero menu bar.Brasero should work fine after that.
If you do want to normalize audio, you can do that separately by installing a package called, well,
normalize-audio. It's command-line but fairly straightforward to use.WinFF
After being impressed with soundconverter, I decided to look for a front end for ffmpeg. What I found was WinFF, a multiplatform graphical interface to the video converter.
No more need to remember all the command-line option as WinFF already incorporates several presets. WinFF's layout is also quite intuitive, so there's not much to explain.

However, as I already covered before, the
No more need to remember all the command-line option as WinFF already incorporates several presets. WinFF's layout is also quite intuitive, so there's not much to explain.

However, as I already covered before, the
ffmpeg in the Ubuntu repositories does not incorporate some proprietary codecs. For this reason, it's best to compile and install your own. Then, specify the location of the files in WinFF's preferences.
soundconverter
I recently, er, acquired a set of music files in

Really, there's not a whole lot to write about soundconverter. It does what its name says it does. You just specify the files you want to convert, and hit the convert button. Of course, before you do that, you might want to set up the preferences so you can specify the format you want.

.flac format. While they play well enough on Totem and Rhythmbox, they won't on my iPod Touch (more on my love-hate relationship with the iPod Touch next time.) I had to find a way to convert them to a compatible format. A few quick searches on Google turned up soundconverter.
Really, there's not a whole lot to write about soundconverter. It does what its name says it does. You just specify the files you want to convert, and hit the convert button. Of course, before you do that, you might want to set up the preferences so you can specify the format you want.

Compiling an ffmpeg that can transcode to MPEG
What is with multinational companies and their love affair with proprietary media formats? Is it too much to ask for support for an open format like Ogg? But oh no, they just have to go with closed formats, and we, suckers for their products that we are, have to go through all sorts of contortions to cram our videos into their devices.
Case in point: I am the recent recipient of an iPod Touch, and for the longest time, I have used nothing but Nokia cellphones. Hip and cool that may sound, but both the iPod Touch and Nokia cellphone unfortunately won't play AVI files or Ogg videos, only MP4s.
Alright, so why not use a product like
This has been a long-standing problem for me. Luckily, I stumbled on this neat how-to from Paul Battley. There's some recompilation of the
First, install some dependencies:
Paul recommends getting the
However, an alternative is to download it from ffmpeg.org.
Unzip the archive, if needed, and then enter the working directory:
Then, run the configuration script:
And then, compile the program:
Finally, to install the resulting package
If you have the
Case in point: I am the recent recipient of an iPod Touch, and for the longest time, I have used nothing but Nokia cellphones. Hip and cool that may sound, but both the iPod Touch and Nokia cellphone unfortunately won't play AVI files or Ogg videos, only MP4s.
Alright, so why not use a product like
ffmpeg to do the transcoding. Neat idea in theory, however, because of licensing restrictions, the ffmpeg in the Ubuntu repositories does not convert to MP4. Can you see me pulling out my hair now?This has been a long-standing problem for me. Luckily, I stumbled on this neat how-to from Paul Battley. There's some recompilation of the
ffmpeg code involved, but it's not too difficult. Since it's been written for Hardy, I thought I'd post my own steps for Jaunty.First, install some dependencies:
sudo apt-get build-dep ffmpeg

sudo apt-get install libmp3lame-dev libfaad-dev libfaac-dev  libxvidcore4-dev \
liba52-0.7.4 liba52-0.7.4-dev libx264-dev libdts-dev libgsm1-dev \
checkinstall build-essential subversion
Paul recommends getting the
ffmpeg from source via Subversion:svn checkout svn://svn.ffmpeg.org/ffmpeg/trunk ffmpegHowever, an alternative is to download it from ffmpeg.org.
Unzip the archive, if needed, and then enter the working directory:
cd ffmpegThen, run the configuration script:
./configure --enable-gpl --enable-postproc --enable-libvorbis \
--enable-libdc1394 --enable-libgsm --disable-debug --enable-libmp3lame \
--enable-libfaad --enable-libfaac --enable-libxvid --enable-pthreads \
--enable-libx264 --enable-nonfree
And then, compile the program:
makeFinally, to install the resulting package
sudo checkinstallIf you have the
ffmpeg from the repositories, it won't necessarily conflict with this installed package; however, do note that this customized ffmpeg is installed at /usr/local/bin/ffmpeg.
Gnome Subtitles
VLC and Totem will work with .srt subtitle files for the many video file formats that they play. But how do you make or edit these files? Gnome Subtitles does this job perfectly.
I had occasion to use this program because I procured -- ahem! -- a foreign language film for the Literature class I teach. Unfortunately there were no subtitles. I managed to locate a decent subtitle file, but it was timeshifted several seconds early. I did a quick search for tools that could help me synch the subtitles with the video properly and voila!

Guess what film we're watching?
I had occasion to use this program because I procured -- ahem! -- a foreign language film for the Literature class I teach. Unfortunately there were no subtitles. I managed to locate a decent subtitle file, but it was timeshifted several seconds early. I did a quick search for tools that could help me synch the subtitles with the video properly and voila!
gnome-subtitles fit that bill.
Guess what film we're watching?
What I Love and Hate About Inkscape
Every since I discovered it two years ago, Inkscape has become an indispensable part of my graphic design toolbox. Not that I'm any pro, mind you; graphic design is just something I do on the side, e.g., the occasional signage for our family business, or for when I'm fiddling around with web templates. Having grown up on Corel Draw, I can say unequivocally that Inkscape does it many, many times better. Inkscape gets more use from me than does GIMP, but then again, I'm more of a vector guy than pixel painter.
Then again, there are the minor annoyances, too.
What I like about Inkscape:
And the stuff I don't like:
Then again, there are the minor annoyances, too.
What I like about Inkscape:
- Resize and rescale text: Perfect for making signs and logos.
- Near-perfect measurement: If it says 20cm on Inkscape, it comes out 20cm (at 72dpi).
- Intuitive operations: Inkscape is very easy to learn.
- Keyboard shortcuts for everything: I don't have to go looking for any icons for my oft-used functions.
- Works great with my printers when printing out portrait documents.
And the stuff I don't like:
- On my laptop, the Inkscape window won't maximize. This is a known bug. To get around it, I have to detach one of the toolbars.
- Won't print out landscape documents properly. This may be a problem with my printer driver, though. Still, it's an annoyance. I have to save the document as PNG and print it using Evince.
- No integrated animation features...yet. Animation would just make Inkscape rock. In the meantime, though, we have to content ourselves with addons.
Convlit
Arguably one of the most popular posts on this blog, Converting Lit Files still gets comments up to this day, more than two years after I wrote it. Now, I haven't had much occasion to convert any more Microsoft format ebooks lately -- I'm reading more dead-tree versions, and because if I do use ebooks they tend to be either in plain-text or PDF format; however, several people have written in to put a word for
Converting a book with
(Take note, the executable is
Easy, huh?
From the
convlit, so I thought I'd give it a mention all its own.convlit basically simplifies everything I've posted about converting Lit files. Instead of the contortions I documented earlier, all you really need now is to just install one package. And...it works.Converting a book with
convlit follows the basic format:clit ebook-propietary.lit ebookdirectory\(Take note, the executable is
clit, not convlit.)Easy, huh?
From the
convlit help page:ConvertLIT comes with ABSOLUTELY NO WARRANTY; for details see the COPYING file or visit "http://www.gnu.org/license/gpl.html". This is free software, and you are welcome to redistribute it under certain conditions. See the GPL license for details.
This program has three modes of operation: First, is ** EXPLOSION **, or the expanding of a .LIT file into an OEBPS compliant package.
To explode, you type: clit\
For Example:
clit ebook-propietary.lit ebook-oebps\
If the directory does not exist, you MUST put a trailing \ or / after it!
To disable creating multiple subdirectories, use the "-d" flag.
Second, is the DOWNCONVERTING of a .LIT file down to "Sealed", or DRM1 format for reading on handheld devices.
To downconvert, you type: clit
For Example:
clit "drm5 ebook.lit" ebook-open.lit
Third, is the INSCRIBING of a .LIT file which allows you to label your ebooks. This is very similar to downconverting, you just add a third argument: clit
For example:
clit ebook.lit inscribed.lit "the Library of Basil Frankweiler"
DRM5 is supported if you have a "keys.txt" file that contains the private key(s) for your passport(s) in either the CLIT program directory or the current directory. Use the -kflag to force the location of your keys.txt
This is a tool for **YOUR OWN FAIR USE** and not for stealing other people's ebooks.
Please do not use this program to distrbute illegal copies of ebooks.... that would make Baby Jesus sad.
Blender
I previously showcased my summer student Angelie's work on Synfig on this blog. Now it's time to show off a character animation done in Blender by another student, Paul Jims Cabahug. Paul had just picked up on the tool last summer, did all the research (with only encouragement from me, as I don't know Blender), and put together the animation by himself in two weeks.
A touching side note: during his presentation, Paul told us he named this character Rusty, after his beloved dog who passed away.
Proprietary Video Drivers
In the office, I use an NVIDIA GeForce 9400GT; at school, we use ATI Radeon HD2600. What's wrong with this picture?
Nothing much, unless you consider that in both cases I have to install the proprietary drivers when I'm using Ubuntu. For the most part, they work, too. So what could be the problem with that?
Well, whenever I upgrade the kernel, as happens with the Update Manager, the graphics breaks after the reboot. Either I'm left with a low-resolution screen, or worst case, no screen at all. This is because the proprietary graphics driver is tied to the kernel, and vice versa. Changes in the kernel will not automatically reflect the graphics driver. Hence, a reinstall is needed.
After a kernel upgrade, I find it helpful to boot into recovery mode and reinstall the graphics driver (therefore, don't delete the graphics driver; keep it handy on disk). It takes all of five minutes, after which I can just resume booting. Graphics should work fine after that.
Still, it is a bother. But since I want some gaming goodness out of my machine, I'm stuck with this less than optimal solution.
Nothing much, unless you consider that in both cases I have to install the proprietary drivers when I'm using Ubuntu. For the most part, they work, too. So what could be the problem with that?
Well, whenever I upgrade the kernel, as happens with the Update Manager, the graphics breaks after the reboot. Either I'm left with a low-resolution screen, or worst case, no screen at all. This is because the proprietary graphics driver is tied to the kernel, and vice versa. Changes in the kernel will not automatically reflect the graphics driver. Hence, a reinstall is needed.
After a kernel upgrade, I find it helpful to boot into recovery mode and reinstall the graphics driver (therefore, don't delete the graphics driver; keep it handy on disk). It takes all of five minutes, after which I can just resume booting. Graphics should work fine after that.
Still, it is a bother. But since I want some gaming goodness out of my machine, I'm stuck with this less than optimal solution.
My student's Synfig animation
I already blogged about this before but I wanted to show my student Angelie Abong's complete animation clip that she did from last summer. Angelie did this using Synfig with some help from KDEnlive and Audacity. Not bad considering it's a one-woman job, done by a complete animation novice at that.
And really creepy, too!
A4Tech Webcam
Since Mom and Dad recently discovered Skype, they've hinted, as in strongly hinted, that they want to be able to chat via webcam, too. What can I say? I could really hide it from them for so long.
In response to this request, I went out and bought a webcam for my desktop. I wasn't sure which one would work, so I took a shot in the dark and bought an A4Tech PK-635K from my friend's computer shop. Not as cheap as I would have gotten it from CDR-King, but pretty cheap considering the brand.
The package set Driver-Free. I asked the salesgirl about this, and she said, "Yes, it comes with a free driver." Just had to roll my eyes up at that one.
In any case, the webcam works as advertised, both for photos and videos. Here's a demo of the video capabilities under Cheese.
This is the output from my
As promised, no driver needed! Plugged it in and it worked immediately.
It's supposed to have a built-in microphone but it was crappy so I had to resurrect an old PC microphone (the only remnant of an Aptiva I bought over ten years ago).
For my sound settings, it worked with HDA Intel (ALSA Mixer). It helped that I added the Mic Boost option in the panel.

On Skype, I'm just using
In response to this request, I went out and bought a webcam for my desktop. I wasn't sure which one would work, so I took a shot in the dark and bought an A4Tech PK-635K from my friend's computer shop. Not as cheap as I would have gotten it from CDR-King, but pretty cheap considering the brand.
The package set Driver-Free. I asked the salesgirl about this, and she said, "Yes, it comes with a free driver." Just had to roll my eyes up at that one.
In any case, the webcam works as advertised, both for photos and videos. Here's a demo of the video capabilities under Cheese.
This is the output from my
/var/log/messages:May 28 17:05:04 union kernel: [ 59.184055] usb 1-4: new high speed USB device
using ehci_hcd and address 4
May 28 17:05:04 union kernel: [ 59.411303] usb 1-4: configuration #1 chosen fr
om 1 choice
May 28 17:05:04 union kernel: [ 59.487423] Linux video capture interface: v2.00
May 28 17:05:04 union kernel: [ 59.510033] uvcvideo: Found UVC 1.00 device A4 TECH PC Camera (093a:2700)
May 28 17:05:04 union kernel: [ 59.513371] input: A4 TECH PC Camera as /devices/pci0000:00/0000:00:1a.7/usb1/1-4/1-4:1.0/input/input8
May 28 17:05:04 union kernel: [ 59.517113] usbcore: registered new interface driver uvcvideo
May 28 17:05:04 union kernel: [ 59.517117] USB Video Class driver (v0.1.0)As promised, no driver needed! Plugged it in and it worked immediately.
It's supposed to have a built-in microphone but it was crappy so I had to resurrect an old PC microphone (the only remnant of an Aptiva I bought over ten years ago).
For my sound settings, it worked with HDA Intel (ALSA Mixer). It helped that I added the Mic Boost option in the panel.

On Skype, I'm just using
pulse for both input and output.EasyTag

EasyTag is a graphical utility to edit the descriptive ID3 tags for your music files. One will think primarily of MP3 files, but it also does other formats, such as Ogg and FLAC.
For Ubuntu and Debian, EasyTag is part of the
universe repository so an install is just a quick apt-get install easytag away.Once you start up EasyTag, it will search your home directory for any and all music format files. This behavior is either helpful or annoying; it it's the latter, you can simply stop the search and go to the directory of your choice. It will resume the search from there.
EasyTag's screen real estate is divided into three windows. The left window shows you the directories of your file system. The middle window shows you the music files in your currently selected directory. The right window is further subdivided into top and bottom information boxes: the top shows you the technical information about the file (bit rate, frequency, mode, size, and time), and the bottom shows you the actual ID3 fields.
The ID3 fields are pretty complete as they let you fill in all the relevant info you could want to put in, e.g., title, artist, album, year, genre, personal comments. You can also attach a photo to the file.
There's three ways to tag music files with EasyTag: manually, automatically with the "Fill Tag" scanner, or automatically via CDDB. CDDB is a database for software applications to look up audio CD (compact disc) information over the Internet.
Manual tagging is pretty much self-explanatory (and tedious.)
Automatic Fill Tag relies on the filenames of your music files to automatically fill in the ID3 entries. EasyTag has a couple dozen formats that cover almost every imaginable case.
Automatic CDDB tagging only works if files are sorted per album and if the actual CDDB entry exists. You don't actually have to have the CD on hand: you can search for the album ID through EasyTag. Once found, it will label the files for you.
All in all, a great way to manage and maintain information on your music files.
Putting together a radio ad
If my recent entries on this blog have been focused on desktop audio processing, it's because I've had to put together a radio ad for our music learning center.
You can listen to the ad (MP3, 820kB) and read about the voice talent behind it.
As you already know, I used mplayer to extract audio from the video file and Audacity to mix the voice and background music.
Other interesting details from this experience: I used a Nokia N70 and a Canon Powershot A540 to record the video. Between the two, the N70 had the superior recording capability. The N70's output was in MP4, and produced a stereo audio channel as opposed to the Powershot's mono. Really neat, actually.
You can listen to the ad (MP3, 820kB) and read about the voice talent behind it.
As you already know, I used mplayer to extract audio from the video file and Audacity to mix the voice and background music.
Other interesting details from this experience: I used a Nokia N70 and a Canon Powershot A540 to record the video. Between the two, the N70 had the superior recording capability. The N70's output was in MP4, and produced a stereo audio channel as opposed to the Powershot's mono. Really neat, actually.
Sound editing with Audacity
In past entries, I've written about extracting audio from video files. Now, I've taken the task one step further and edited the voice file to come up with a passable radio ad.
For open source sound editing, nothing really beats Audacity. Audacity is fairly intuitive so that even I, who had never done work like this before, found it quite easy to use.

The key to Audacity is the multiple tracks that it allows you to load edit. Audacity can read WAV files, MP3 files, MIDI files, and many more. Once loaded, you can mix the audio files. You can shift them in time, you can adjust the volume, and you can apply dozens of filters to remove noise, change pitch, alter tempo, level out sound. There are just so many ways to process audio files.
In my case, I had a voiceover narration ripped from a Nokia N70 video (a clunky phone, if there ever was one, but the sound quality is excellent). I loaded that into Audacity, and mixed it with a Jazz track in the background. Since the radio ad was supposed to be under a minute, I chose the most suitable clip and plunked the voiceover smack in the middle. For good measure, I applied fade-out effect at the end of the audio.
Audacity is great for musicians. They can record individual tracks and then mix them all up later. Audacity would also be great for podcasters.
I won't go into the nitty gritty details of the workings of Audacity, but you can read the manual online. The manual has a set of tutorials that can help you get started quickly.
For open source sound editing, nothing really beats Audacity. Audacity is fairly intuitive so that even I, who had never done work like this before, found it quite easy to use.
The key to Audacity is the multiple tracks that it allows you to load edit. Audacity can read WAV files, MP3 files, MIDI files, and many more. Once loaded, you can mix the audio files. You can shift them in time, you can adjust the volume, and you can apply dozens of filters to remove noise, change pitch, alter tempo, level out sound. There are just so many ways to process audio files.
In my case, I had a voiceover narration ripped from a Nokia N70 video (a clunky phone, if there ever was one, but the sound quality is excellent). I loaded that into Audacity, and mixed it with a Jazz track in the background. Since the radio ad was supposed to be under a minute, I chose the most suitable clip and plunked the voiceover smack in the middle. For good measure, I applied fade-out effect at the end of the audio.
Audacity is great for musicians. They can record individual tracks and then mix them all up later. Audacity would also be great for podcasters.
I won't go into the nitty gritty details of the workings of Audacity, but you can read the manual online. The manual has a set of tutorials that can help you get started quickly.
Extracting audio from an AVI file
More multimedia goodness today. Now we'll look at extracting audio from an AVI file.
Why would you want to do this? A number of reasons: you might want to rip the sound from a video to remix in an audio project. That's the task at hand for me, as I'm putting together a radio ad from videos taken of the students at my music studio. (Oh, did I mention that? I "inherited" a music studio.)
Or maybe you just need to grab the audio to play it on your archaic music player.
In any case, the task is easy enough with
Extracting the audio is a one-line command under
The
The
Of course, the end result is a relatively large WAV file. You'll need to convert this to your desired format, the topic of a future post.
Why would you want to do this? A number of reasons: you might want to rip the sound from a video to remix in an audio project. That's the task at hand for me, as I'm putting together a radio ad from videos taken of the students at my music studio. (Oh, did I mention that? I "inherited" a music studio.)
Or maybe you just need to grab the audio to play it on your archaic music player.
In any case, the task is easy enough with
mplayer.Extracting the audio is a one-line command under
mplayer:mplayer -ss 01:21 -endpos 29 -vo null -ao pcm:file=myfile.wav myfile.aviThe
-ss option tells mplayer to start at 1 minute and 21 seconds.The
-endpos option (since it's used in conjunction with -ss) will record up to 29 seconds.-ao pcm:file= tells mplayer which file to save the resulting WAV file to.Of course, the end result is a relatively large WAV file. You'll need to convert this to your desired format, the topic of a future post.
Splitting an AVI file into smaller parts
As a continuation of Creating VCDs from AVI files, we look at splitting a large AVI file into two or more smaller files. Why would you want to do that? Well, let's say that you have an AVI file that's, oh, around 700MB in size. Converting this to MPEG would result in a file that's twice the size. Hence, the need to split it into smaller files.
You can do this using
To split a file into two pieces, execute the following commands:
The pair of commands above will cut the movie at the one-hour mark.
What if you want to cut it into three or more pieces? The commands above would correspond to the first and last portion of the video. For the middle portions, you would do something like:
This will grab the segment between the first and second hour marks of the video.
Got this from MisterHowTo.com: Trim or split videos with Mencoder.
You can do this using
mencoder.mencoder is a companion package to mplayer. It's part of the same project but must still be installed separately....you know what to do.To split a file into two pieces, execute the following commands:
mencoder -endpos 01:00:00 -ovc copy -oac copy movie.avi -o first_half.avi

mencoder -ss 01:00:00 -oac copy -ovc copy movie.avi -o second_half.avi
The pair of commands above will cut the movie at the one-hour mark.
What if you want to cut it into three or more pieces? The commands above would correspond to the first and last portion of the video. For the middle portions, you would do something like:
mencoder -ss 01:00:00 0 -endpos 02:00:00 -oac copy -ovc copy movie.avi -o second_half.aviThis will grab the segment between the first and second hour marks of the video.
-ss indicates where you want to start the encoding.-endpos indicates where you want to end.-oac and -ovc specify the encoding scheme. The copy option tells mencoder to just copy the file as is with no special encoding.-o specifies the output file.Got this from MisterHowTo.com: Trim or split videos with Mencoder.
Creating VCDs from AVI files
For all the advances in Blu-Ray and DVD technology, the venerable Video CD format is still very much alive. Oh, it's sitting quietly in the sidelines nowadays, but it still remains the least common denominator in video distribution technology. Legitimate video shops (at least here in the Philippines) still thrive on sales of VCD disks.
Recently, I've had cause to create a VCD out of a video that I downloaded from Youtube. Piracy? Well, let's just say I'm treading a gray area here.
The story behind this is: my Mom caught part of a local political documentary on TV but was unable to view the segment in its entirety. Seeing how important it was to her, I found the video on Youtube. Ordinarily, I would have just sat her in front of the computer, but Mom preferred to watch on TV. Solution: download and convert the video and turn it into a VCD.
I'll skip the details on the Youtube video download for now and head directly into the part about converting the resulting AVI file into a VCD.
There are two packages you'll need to perform the conversion:
Install these two packages and their dependencies. By now you should already know how.
Let's say we have three files called
1) First, convert each file into an MPEG file. To do that,
2) Then, run
This will create two files,
3) Burn
After burning, the VCD should be viewable in any player.
Recently, I've had cause to create a VCD out of a video that I downloaded from Youtube. Piracy? Well, let's just say I'm treading a gray area here.
The story behind this is: my Mom caught part of a local political documentary on TV but was unable to view the segment in its entirety. Seeing how important it was to her, I found the video on Youtube. Ordinarily, I would have just sat her in front of the computer, but Mom preferred to watch on TV. Solution: download and convert the video and turn it into a VCD.
I'll skip the details on the Youtube video download for now and head directly into the part about converting the resulting AVI file into a VCD.
There are two packages you'll need to perform the conversion:
ffmpeg and vcdimager.ffmpeg is a handy-dandy command line video converter. It's command options are numerous and can be confusing, but you really only need a few standard sequences for most conversion jobs. vcdimager is, as the name implies, a tool to create VCD images from MPEG files. That's really why we need ffmpeg: because vcdimager only works with MPEG.Install these two packages and their dependencies. By now you should already know how.
Let's say we have three files called
spratlys1.avi, spratlys2.avi, and spratlys3.avi. These are the steps to convert them into one VCD image:1) First, convert each file into an MPEG file. To do that,
ffmpeg -i spratlys1.avi -target ntsc-vcd spratlys1.mpg

ffmpeg -i spratlys2.avi -target ntsc-vcd spratlys2.mpg

ffmpeg -i spratlys3.avi -target ntsc-vcd spratlys3.mpg
2) Then, run
vcdimager over these files.vcdimager -t vcd2 -l "SPRATLYS" -c vcd.cue -b vcd.bin spratlys1.mpg spratlys2.mpg spratlys3.mpgThis will create two files,
vcd.bin and vcd.cue in the same directory.3) Burn
vcd.bin and vcd.cue into CD using the following command: cdrdao write --device /dev/cdrw vcd.cueAfter burning, the VCD should be viewable in any player.
Feisty's Codec Wizard
Totem, which has shipped by default with Ubuntu since the very first version, has always been the odd man out in an otherwise great distribution. Its utility has been severely limited, able to play only the OGG file format. It's great that it adheres to the free software-only philosophy, but it makes it all that much harder to win new converts.
(You'll recall that in previous posts, I've talked about installing and using Mplayer as a way to get around Totem's limitations.)
Finally, with Ubuntu 7.04 Feisty Fawn, we might finally have some use for Totem after all, thanks to Feisty's codec wizard.
How do you bring up the codec wizard? Well, you don't. It comes out automatically, and that's what's great about it.
I downloaded a large AVI movie (ahem! never mind where) and when it was all good and ready, I double-clicked the file. Totem came up, recognized that it didn't have the codec, and prompted me with:

Do I want to install a new codec? Absolutely!
Helpfully, Feisty shows me my options.


I can choose to install only one but I can also choose two or all three. Greedy fellow that I am, I ultimately choose all three.

Note that this is not much different from installing the codecs yourself manually. It's just nice touch not to have to wonder what exactly it is you have to install.
And before long, I was already viewing my new video.
(You'll recall that in previous posts, I've talked about installing and using Mplayer as a way to get around Totem's limitations.)
Finally, with Ubuntu 7.04 Feisty Fawn, we might finally have some use for Totem after all, thanks to Feisty's codec wizard.
How do you bring up the codec wizard? Well, you don't. It comes out automatically, and that's what's great about it.
I downloaded a large AVI movie (ahem! never mind where) and when it was all good and ready, I double-clicked the file. Totem came up, recognized that it didn't have the codec, and prompted me with:

Do I want to install a new codec? Absolutely!
Helpfully, Feisty shows me my options.


I can choose to install only one but I can also choose two or all three. Greedy fellow that I am, I ultimately choose all three.

Note that this is not much different from installing the codecs yourself manually. It's just nice touch not to have to wonder what exactly it is you have to install.
And before long, I was already viewing my new video.
Subscribe to:
Posts (Atom)

 Posts
Posts

